Showing posts with label Recipes. Show all posts

Bacon, Avocado, and Tomato Sandwich

It seems as though bacon is going through one of those "I'm so popular/just put bacon on everything" sort of phases. I'm definitely okay with this. I'm totally on board with the bacon trend and trying new and inventive bacon-inspired dishes. But there's something so refreshing about the classics, like the bacon, lettuce (or avocado), and tomato sandwich.

Why do I sub avocado for lettuce in my BLT? Because I prefer something with a little bit of flavor, people. Don't get me wrong--I totally love lettuce, but I often consider it filler. I like a BLT with some punch, and bacon on top of that sliced avocado makes for a real winner.


You probably don't even need a recipe for this one, but here it goes anyway.

What you'll need:

  • Two slices of bread (I prefer the really yummy, seedy kind)
  • 1 medium-sized tomato, sliced
  • 1 ripe hass avocado, sliced
  • Mayonnaise
  • 2-3 slices of cooked bacon

1. Toast your slices of bread until they're nice and golden.

2. Garnish your bread with plenty of mayo, tomato, avocado, and bacon.

3. Eat.


Delicious, I know.

Blogging About Biscotti

Hey, hey. You can check me out over on Camille Styles today blogging about one of my favorite coffee shop snacks: biscotti! Cranberry pistachio biscotti, that is. Hop on over to see more photos and grab the recipe for yourself.


Thanks so much for having me Camille and Camille Styles team!

Baked Potato Soup

Mmmmm ... you can't go wrong with bacon, potatoes, sour cream, and lots and lots of garlic. My favorites recipes this time of year are the delicious and hearty ones, much like this one by Smitten Kitchen for tasty baked potato soup.

This recipe is for garlic lovers. It calls for an entire head of garlic and I love how you cook and simmer it with the potatoes and broth.


What you'll need:
  • 1 head of garlic
  • 3 T unsalted butter
  • 2 medium leeks, white and green parts chopped
  • 6 cups vegetable or chicken broth
  • 2.5 pounds russet potatoes, cut into 1/2-inch cubes (I left the skins on for the extra nutrients.)
  • 1/3 cup sour cream
  • Salt
  • Scallions, chopped
  • Bacon bits
  • Grated cheese
  • Extra sour cream


1. Take your head of garlic and chop off the top third. Pop out the cloves from that top third and mince them. Leave the larger part of the garlic head whole.

2. In a large pot, melt the butter over medium heat and then cook the leeks for about 5 minutes until they're soft.

3. Add the minced garlic and cook another minute.

4. Then add the larger part of the garlic head, broth, and 3/4 teaspoon salt.

5. Reduce the heat and simmer for 30 to 40 minutes until the garlic is super tender. Add potatoes and continue to simmer for another 15 to 20 minutes, partially covered, until the potatoes are tender.

6. Remove the garlic head and squeeze the tender garlic cloves onto a cutting board. Take a fork and mash the garlic cloves into a smooth paste and add it back to the soup. This will make your soup super garlicky.

7. Add sour cream to the soup and cook for another 2 to 3 minutes.

8. Add your salt and pepper to taste.

9. Transfer a portion of the potatoes and broth to a food processor or blender and puree until smooth.

10. Serve and dress with more sour cream, cheese, bacon bits, and scallions as the toppings.

Ta-da! Soup!

Peanut Butter and Jelly Cupcakes

Peanut butter and jelly sandwiches were always a childhood favorite of mine. I still enjoy a good ol' PB&J with a giant glass of milk. I try to avoid having bread in the house for this very reason. If there's bread there's also peanut butter and that makes for way too many PB&J sandwiches. But a cupcake here and there never hurt anyone. I went off this little recipe here to make some peanut butter and jelly cupcakes.

peanut butter and jelly cupcakes

What you'll need:

Jelly Cupcakes
  • 1 stick of butter at room temperature
  • 1 cup sugar
  • 1.5 cup flour
  • 1.5 t baking powder
  • 1/2 t salt
  • 1/2 cup sour cream
  • 2 large eggs
  • 1 large egg yolk
  • 2 t vanilla extract
  • 1 cup strawberry jelly

Peanut Butter Cream Cheese Frosting
  • 1/2 stick butter at room temperature
  • 1 t vanilla extract
  • 1 8 oz. package cream cheese
  • 1 cup creamy peanut butter
  • 1.5 cup powdered sugar
  • Rainbow sprinkles for garnish

1. Preheat oven to 350 degrees, and line a standard 12 cup muffin tin with cupcake liners.

2. Get your stand mixer ready. Add the butter and sugar and beat for 3-4 minutes until light and fluffy.

3. Meanwhile, in a medium bowl whisk together the flour, baking powder, and salt.

4. Add the sour cream to the butter and sugar mixture and continue to beat until incorporated.

5. Add the eggs and yolk, 1 at a time, beating until thoroughly mixed in.

6. Add in the vanilla and continue to mix.

7. Slowly add the flour, salt, and baking powder mixture and mix until combined.

8. Scoop the batter into the cupcake liners to fill 3/4 of the way. Bake in the oven for 18-20 minutes until the cupcakes are a pale gold color and a toothpick comes out clean.

9. Remove the cupcakes from the oven and let cool in the tin.

10. As the cupcakes cool, begin making the frosting by beating the butter and cream cheese together in a large bowl until well combined.

11. Add the vanilla and peanut butter and mix well.

12. Slowly add the powdered sugar beat until well mixed.

13. After the cupcakes have completely cooled, fit a plain pastry tip to the bottom of a gallon-sized resealable bag.

14. Fill the bag with strawberry jelly.

15. Insert the tip into the center of the cupcake and slowly squeeze in about 1 tablespoon of jelly.

16. Frost the cupcakes with the peanut butter cream cheese frosting.

17. Sprinkle lightly with the rainbow sprinkles and serve!

Enjoy!

Black Bean Chili

Nothing says warm and hearty like a big bowl of chili. I mean it! And the combinations are endless. I love a good white bean and turkey chili, the classic beefy kind, or a veggie-filled recipe. In fact, I've been craving a good, healthy meal full of all the vegetables I've been missing out on lately. The holidays have my diet all out of whack, so this vegetarian black bean chili recipe was just the thing I needed to start off the new year.


What you'll need:
  • 1/4 cup olive oil
  • 2 cups chopped onion
  • 2 medium red bell peppers, chopped
  • 6 garlic cloves, chopped
  • 2 T chili powder
  • 2 t dried oregano
  • 1.5 t ground cumin
  • .5 t cayenne pepper
  • 3 15 oz. cans of black beans
  • 1 16 oz. can tomato sauce
  • Sour cream
  • Cheese (I chose a 4-cheese blend)
  • Chopped green onions

1. Heat the 1/4 cup oil in a large pot over medium-high heat.

2. Add chopped onions, bell peppers, and garlic and sauté for about 10 minutes until the onions have softened.

3. Mix in the chili powder, oregano, cumin, and cayenne and stir for 2 minutes.

4. In the meantime, drain your black beans, but reserve 1/2 cup of the liquid for the chili.

5. Mix in the beans, tomato sauce, and 1/2 cup of black bean liquid.

6. Bring the mixture to a boil and stir occasionally. 

7. Reduce heat to medium low and simmer for about 15 minutes until the chili thickens.

8. Season to taste with salt and pepper and then serve with sour cream, grated cheese, and green onions. 

Enjoy!

What are your favorite cold-weather recipes?

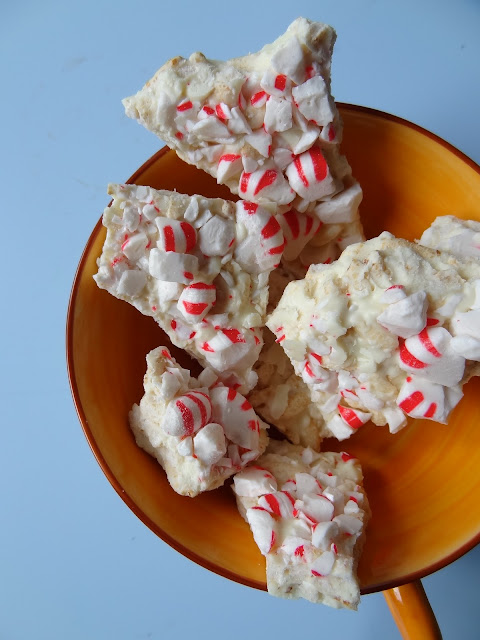
Peppermint White Chocolate Rice Krispie Treats

And my peppermint obsession continues. After eating too much of my homemade peppermint bark, it was time to whip up something new. I decided to make some Rice Krispie treat squares topped with crushed peppermint and white chocolate after seeing something similar at Central Market. Rice Krispie treats are probably some of the easiest sweets to make, which makes them even more delicious during all the holiday hustle and bustle.


Things you'll need:
  • 3 tablespoons butter
  • 40 large marshmallows
  • 6 cups Rice Krispies
  • Crushed peppermint candies (I used about half of a 9 oz bag)
  • 1 bag white chocolate chips
  • 13 by 9 inch baking dish
  • Nonstick cooking spray

1. Crush your peppermint candies by putting them in a double-lined plastic bag. Seal the bag and then wrap it with a kitchen towel. This will prevent the candy from piercing the bag. Then use a rolling pin or skillet to crush the candies. Use a colander to separate the large candy pieces from the candy powder. 

2. Melt the butter and marshmallows in a large saucepan over low heat. Stir constantly until the marshmallows are melted and the mixture is nice and gooey.

3. Remove from heat and pour Rice Krispies and half of the candy pieces into the mixture, and mix well!

4. Transfer the mixture into the greased baking dish and spread to the edges of the dish.

5. As the mixture cools, melt the chocolate chips in the microwave for about 1 minute, stirring about every 30 seconds.

6. Spread the white chocolate over the top of the Rice Krispie treat mix.

7. Sprinkle candy pieces and powder over the white chocolate. Press some of the bigger pieces into the chocolate.

8. Put the dish in the fridge to let the chocolate firm up for about 20-30 minutes, then cut into squares and serve or wrap as a gift!


Easy enough? How about delicious?

Peppermint Bark

I can't resist peppermint-flavored treats during the holidays, especially sweets and those peppermint milkshakes that are so popular this time of year. Right now I'm kind of hooked on trying some of the recipes I've been saving up, and peppermint bark (original recipe found here) was the first one on my list.

I think this kind of holiday treat would make the perfect gift for a friend or secret Santa. And it's pretty darn easy to make too!

peppermint bark

What you'll need:
  • Nonstick cooking spray
  • Wax paper
  • 10 by 15 in. baking sheet
  • 1 pound white chocolate (4 bars)
  • 2 cups puffed rice cereal
  • 1 bag (7.5 oz) hard peppermint candies unwrapped
  • 2 resealable plastic bags

1. Spray your baking sheet with the cooking spray and then line with a sheet of wax paper.

2. Crush your peppermint candies by putting them in a double-lined plastic bag. Seal the bag and then wrap it with a kitchen towel. This will prevent the candy from piercing the bag. Then use a rolling pin or skillet to crush the candies.

3. Use a colander to separate the large candy pieces from the candy powder (but save that for later!)

4. Melt the white chocolate in the microwave or on the stove using a double broiler. I just heated it up in the microwave by breaking up the bars in a microwave-safe bowl for about 60 seconds. Keep a close eye on it as not to burn the chocolate and stir about every 30 seconds. (Careful! The bowl will be hot.)

5. Once the chocolate is nice and gooey, mix 2 cups of puffed rice cereal with the chocolate.

6. Transfer the mixture to the baking sheet and spread it out using a spatula. Martha Stewart says to spread it to the edges of the pan, but I wanted my bark to be thicker so I just spread it out so the mixture was nice and even.

7. Sprinkle the candy pieces all over the top of the mixture.

8. Take another piece of wax paper and cover the entire surface. Gently press the candies into the mixture. Leave the wax paper cover on.

9. Chill in the fridge for 20-30 minutes until firm.

10. Peel the wax paper off and then break the bark into smaller pieces to serve or wrap as a gift!

peppermint bark

And as for that leftover candy powder, I loved Martha's idea to save it to mix with hot chocolate or use as an ice cream topping.

What are some of your favorite holiday flavors? Peppermint? Pumpkin?

Cheesy Jalapeño Buttermilk Biscuits

If you follow me on Twitter or Facebook, you're probably aware that I'm obsessed with my new Kitchen Aid  stand mixer. It was a lovely gift from my mother and Kyle and I are quickly dreaming up all the wonderful things we are going to make with it.

After eating the giant cupcake pictured in this post, I decided I wanted to make something savory and comforting. I immediately thought "buttermilk!" and found this yummy-looking recipe for cheesey jalapeño buttermilk biscuits on A Cozy Kitchen.

buttermilk biscuits

These biscuits were full of cheese and called for the right amount of jalapeño for just the slightest kick.

chopped jalapeno

The recipe also makes eight giant biscuits. I rolled the dough out a little too thin, I think, so they took on a rather rectangular shape. 

biscuit dough

But they were still flaky, salty, and delicious. 

buttermilk biscuits

Do you remember the first thing you made with your stand mixer? Oh, the memories.